HomeTop StoriesHow to build an outdoor movie theater screen for your backyard movie...

How to build an outdoor movie theater screen for your backyard movie night

There’s nothing like the thrill of watching a movie or football match outside. For those balmy summer evenings in your garden or on your patio, take your outdoor entertainment game to the next level with your own DIY outdoor screen.

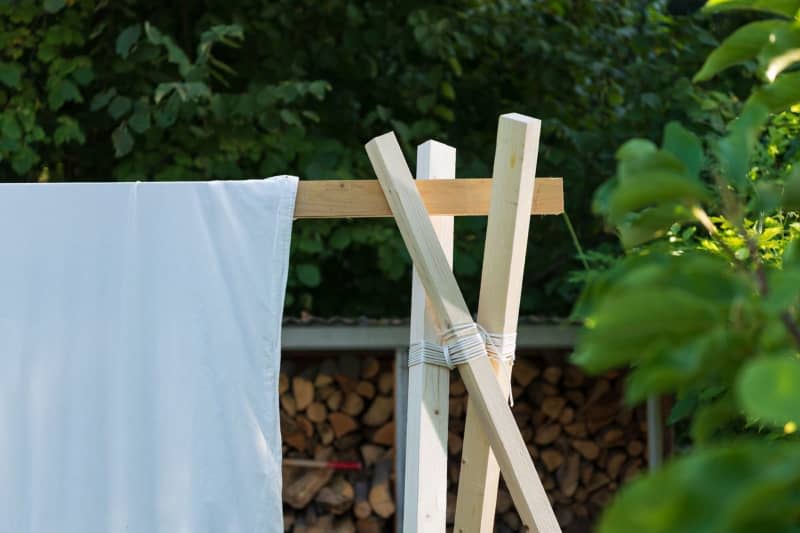
A few shipping knots will come in handy, and this approach from the German DIY Academy involves using a rope to tie long wooden slats together into two tripods that support another slat that will hold up your “screen” – essentially a long white sheet.

The screen is also weighted at the bottom with an extra slat, so that it does not blow around in the wind.

In addition to a projector, you will of course need some cord, wood, a large sheet, and something to secure the weight to your screen, such as tools like a sewing machine, a heavy-duty stapler, or a reliable channel. adhesive tape.

This is what you need:

  • seven wooden slats, each 3 meters long (and approximately 9 x 4 cm)

  • a wooden slat of 2 meters long for hanging the screen

  • 10 meters of nylon cord (diameter 5 mm)

  • an old white sheet or duvet cover of approximately 2.20 by 2.40 meters or a white cotton or linen sheet

  • something to keep the weight at the bottom of the screen, such as a sturdy stapler, sewing kit, or duct tape

  • a second person to set up the canvas

See also  Overnight road closures are planned in Roseville for parkway expansion. Here's when and where

Here is the step-by-step guide Do it yourself experts:

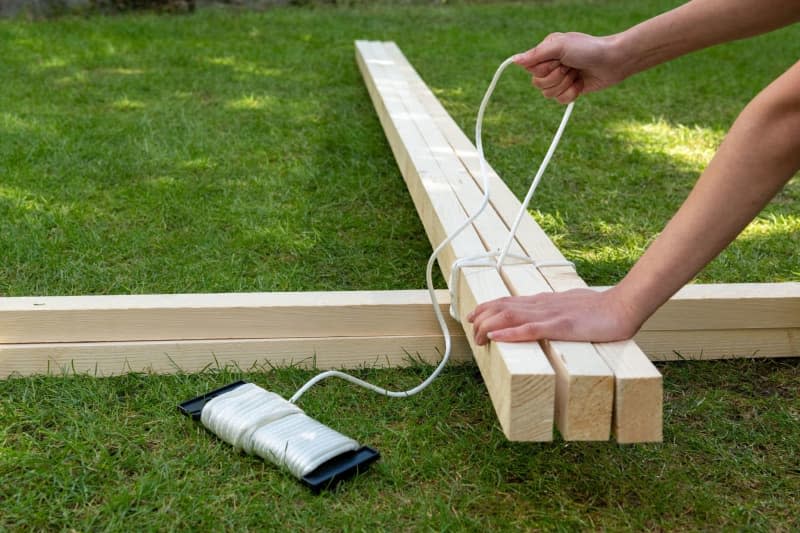
1. First take three of the three meter long slats and place them on top of the others so that you can attach them together. Tie the three pieces of wood together at one end so they can be set up as a stable tripod later. The first step of the knot is the so-called carpenter’s knot. To do this, first wrap the nylon cord around just one of the beams and tie it securely.

2. Now thread the nylon cord over and under all three wooden slats – alternately – a total of five times.

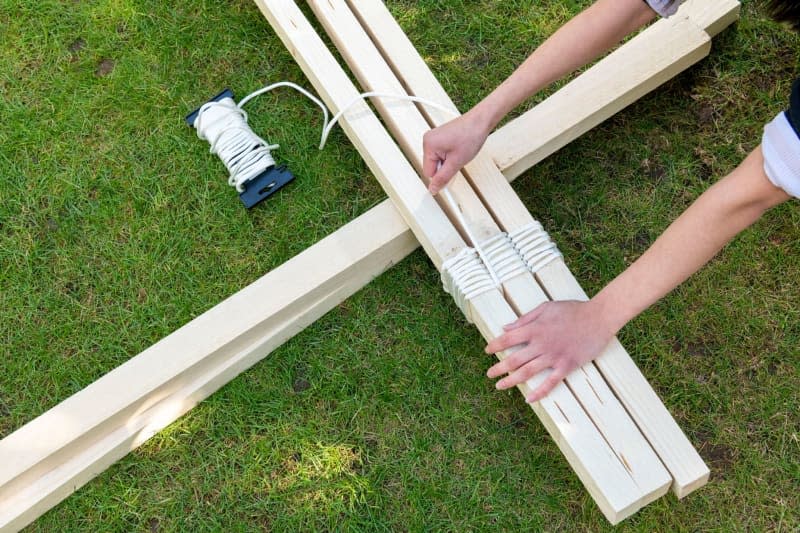
3. Now we tie a so-called parallel lashing knot by wrapping the cord two or three times around the existing cord bundle between the beams. Then guide the cord to the second intermediate area and wrap it around the bundle several times here too. Then return it to the side where you started and repeat the whole process.

See also  Stingray that went viral after mysterious pregnancy dies, aquarium says

4. To secure the three beams in place, you can use the knotting technique known as the clove stitch. This consists of two single towbars in a row. Important: Pull the knot at the end tight and cut off the excess cord.

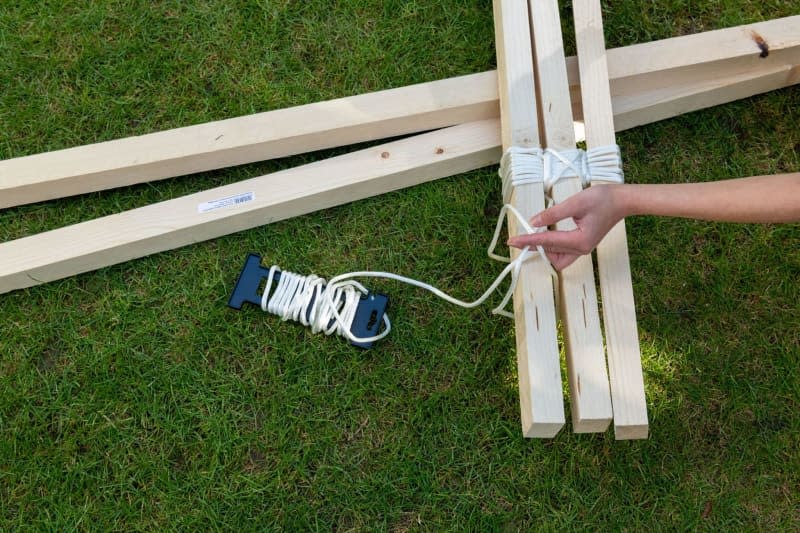
5. You now have one stable tripod. Repeat the above steps for the other side of the frame.

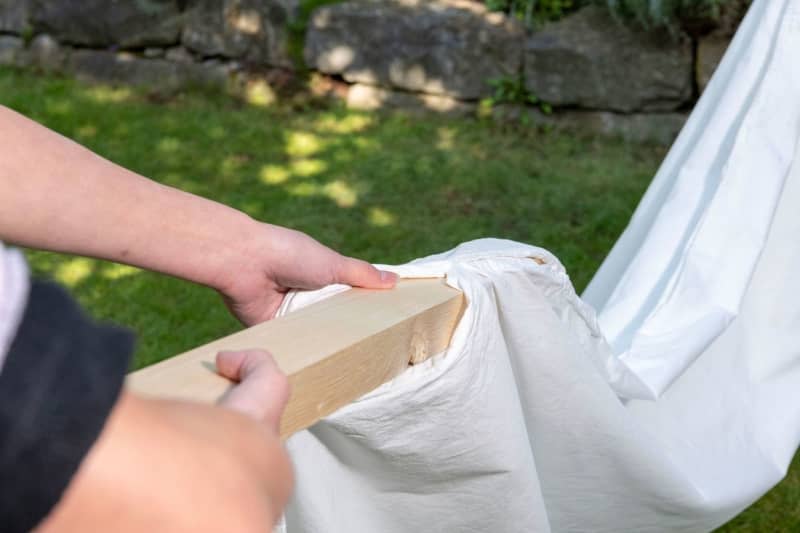
6. Prepare the canvas: Does your sheet or sheet not have side openings for threading the slats? Then it is best to turn one side over and sew it closed.

You can then insert the last longer piece of wood into the resulting tube at the top of your slab. You can also stick the shorter, 7-foot piece of wood at the bottom to weigh it down so your screen doesn’t blow around in the wind. You can also wrap the fabric around the piece of wood a few times and staple it in place or use duct tape.

See also  A Michigan driver whose virtual hearing went viral never had a driver's license, a judge says

7. Place the two tripods approximately 2 meters apart. Then place the top bar with the canvas between the three ends of each tripod. Align the stands and canvas so that your screen is centered and hangs without wrinkles. Now all you have to do is set up your projector nearby and you’re done.

Pass the nylon cord over and under all three slats, always alternating.  Go back and forth a total of five times.  Bosch/DIY Academy/dpa

Pass the nylon cord over and under all three slats, always alternating. Go back and forth a total of five times. Bosch/DIY Academy/dpa

Now we tie a so-called parallel lashing knot by wrapping the cord two or three times around the existing cord bundle between the beams.  Then guide the cord to the second intermediate area and wrap it around the bundle several times here too.  Then return it to the side where you started and repeat the whole process.  Bosch/DIY Academy/dpaNow we tie a so-called parallel lashing knot by wrapping the cord two or three times around the existing cord bundle between the beams.  Then guide the cord to the second intermediate area and wrap it around the bundle several times here too.  Then return it to the side where you started and repeat the whole process.  Bosch/DIY Academy/dpa

Now we tie a so-called parallel lashing knot by wrapping the cord two or three times around the existing cord bundle between the beams. Then guide the cord to the second intermediate area and wrap it around the bundle several times here too. Then return it to the side where you started and repeat the whole process. Bosch/DIY Academy/dpa

To secure the three beams in place you will need to use the knotting technique known as the clove stitch.  It consists of two single towbars in a row.  Bosch/DIY Academy/dpaTo secure the three beams in place you will need to use the knotting technique known as the clove stitch.  It consists of two single towbars in a row.  Bosch/DIY Academy/dpa

To secure the three beams in place you will need to use the knotting technique known as the clove stitch. It consists of two single towbars in a row. Bosch/DIY Academy/dpa

Fold one side of the sheet in half and sew a seam around it.  Insert the two remaining beams into the resulting tubes.  Bosch/DIY Academy/dpaFold one side of the sheet in half and sew a seam around it.  Insert the two remaining beams into the resulting tubes.  Bosch/DIY Academy/dpa

Fold one side of the sheet in half and sew a seam around it. Insert the two remaining beams into the resulting tubes. Bosch/DIY Academy/dpa

Final step: Place the two tripods approximately two meters apart and place the top beam with the canvas between the three ends of each support.  Now align the canvas - and you're done.  Bosch/DIY Academy/dpaFinal step: Place the two tripods approximately two meters apart and place the top beam with the canvas between the three ends of each support.  Now align the canvas - and you're done.  Bosch/DIY Academy/dpa

Final step: Place the two tripods approximately two meters apart and place the top beam with the canvas between the three ends of each support. Now align the canvas – and you’re done. Bosch/DIY Academy/dpa

- Advertisement -
RELATED ARTICLES

LEAVE A REPLY

Please enter your comment!
Please enter your name here

Most Popular

Recent Comments